Creative Nail Decoration Ideas for Everyone
Transforming your manicure from a simple coat of polish into a stunning work of art has never been easier or more accessible. In recent years, nail decorations have evolved from standard salon offerings into a global phenomenon of self-expression. Whether you are looking for a subtle enhancement for the office or a jaw-dropping 3D masterpiece for a special event, the world of nail art offers something for absolutely everyone.
If you are hunting for fresh nail inspiration, you are in the right place. In this comprehensive guide, we will explore the latest nail trends, break down complex techniques into actionable steps, and provide essential nail tips to help your creations last longer. Let’s dive into the ultimate collection of creative nail ideas!

Top Nail Trends and Inspiration for Every Style
Before jumping into advanced techniques, it is important to understand the foundation of current nail styles. You do not need incredibly long acrylics or hours of free time to achieve a beautiful manicure.
Keep It Simple: Minimalist and Hand-Painted Art
Sometimes, less truly is more. If you prefer an understated, elegant look, minimalist negative space styles are incredibly popular right now. This technique involves leaving portions of your natural nail bare (or covered only in a sheer nude base) while adding geometric lines, dots, or small shapes. It is chic, modern, and exceptionally forgiving as it grows out.
For those just starting out, beginner-friendly hand-painted designs are the perfect stepping stone. You don’t need the steady hand of a surgeon to create beautiful art.
- Polka Dots: Use a dotting tool (or the rounded end of a bobby pin) to create flawless flowers or abstract dot patterns.
- Abstract Swirls: Use a fine striping brush to drag a contrasting color across the nail in a fluid, organic motion.
- French Tip Variations: Swap the traditional white tip for vibrant colors, glitter, or even tiny animal prints.
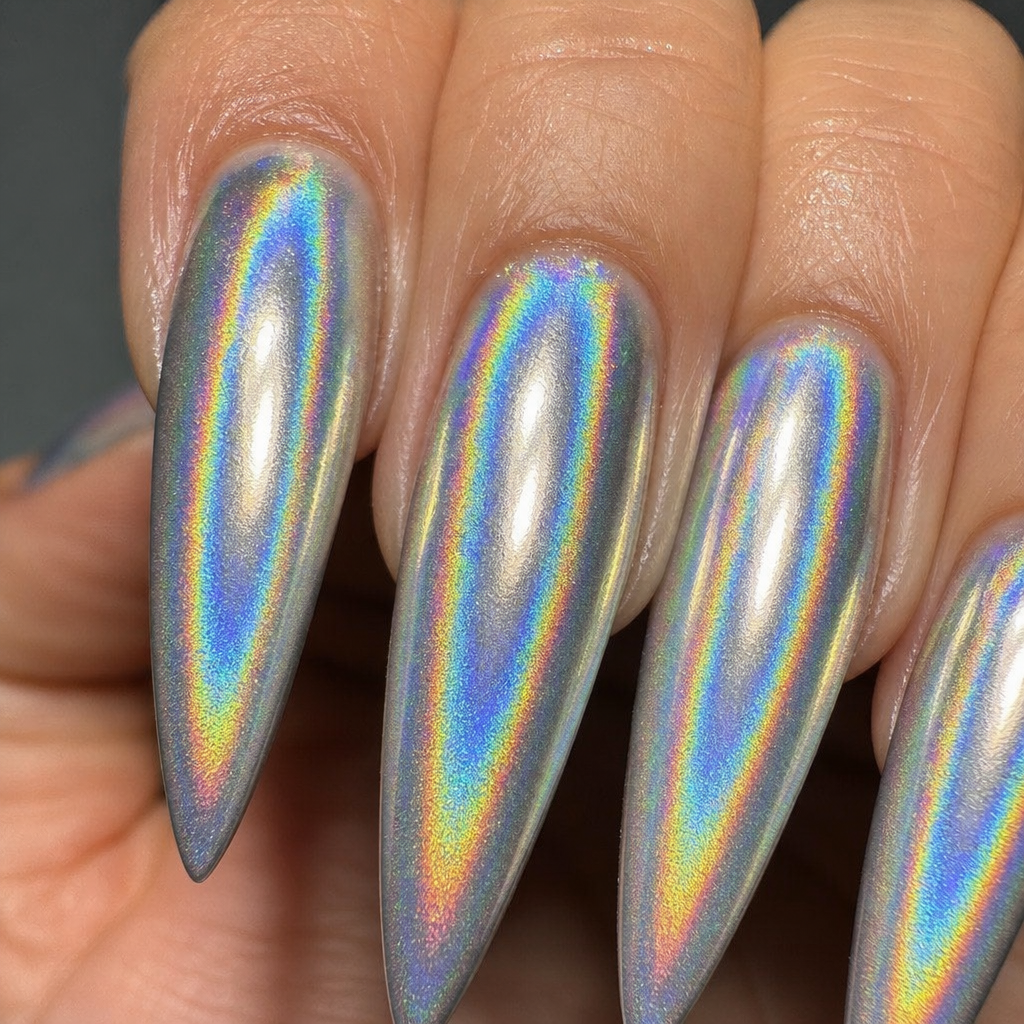
Shine Bright: Powders and Textures
If you want to achieve the viral “glazed donut” or metallic look, you need to master holographic chrome powder application. While it looks complex, the process is actually quite straightforward:
- Apply your base color and cure it completely.
- Apply a high-quality, no-wipe gel top coat and cure it (usually for about 30–60 seconds, depending on your lamp).
- Using an eyeshadow sponge applicator, gently rub the holographic chrome powder onto the warm, cured top coat until it becomes a highly reflective mirror surface.
- Dust off the excess powder with a fluffy brush.
- Seal the powder with another layer of top coat and cure.
Celebrate the Seasons
Swapping your manicure to match the time of year is a brilliant source of nail inspiration. For example, seasonal winter manicure embellishments like textured “cable knit sweater” designs, delicate snowflake stamps, or icy blue metallic foils can instantly put you in a festive mood. During the summer, switch to neon pigments and tropical decals.
Elevating Your Look with Decals and Stamps
Not everyone has the time or desire to hand-paint intricate nail designs. Thankfully, modern nail technology provides plenty of shortcuts that look flawlessly professional.
Decals vs. Stickers
When shopping for quick nail art, you will likely come across two main options. Understanding water decals vs vinyl nail stickers will help you choose the right product for your desired look.
- Vinyl Nail Stickers: These are essentially tiny traditional stickers. They are quick to apply—just peel and stick—but they can be slightly thick, sometimes leaving a raised edge that requires multiple layers of top coat to smooth out.
- Water Slide Decals: These are printed on a microscopic layer of film. When activated by water, they slide off their paper backing and lay completely flat against the nail, looking exactly like hand-painted art.
How to apply water slide decals seamlessly:
- Cut out the desired design as close to the image border as possible.
- Remove the clear protective plastic film.
- Submerge the cutout in room-temperature water for 10 to 15 seconds.
- Using tweezers, gently slide the decal off the paper backing directly onto your polished nail.
- Smooth out any wrinkles with a lint-free wipe or a silicone tool, absorbing excess water.
- Seal immediately with a glossy top coat.
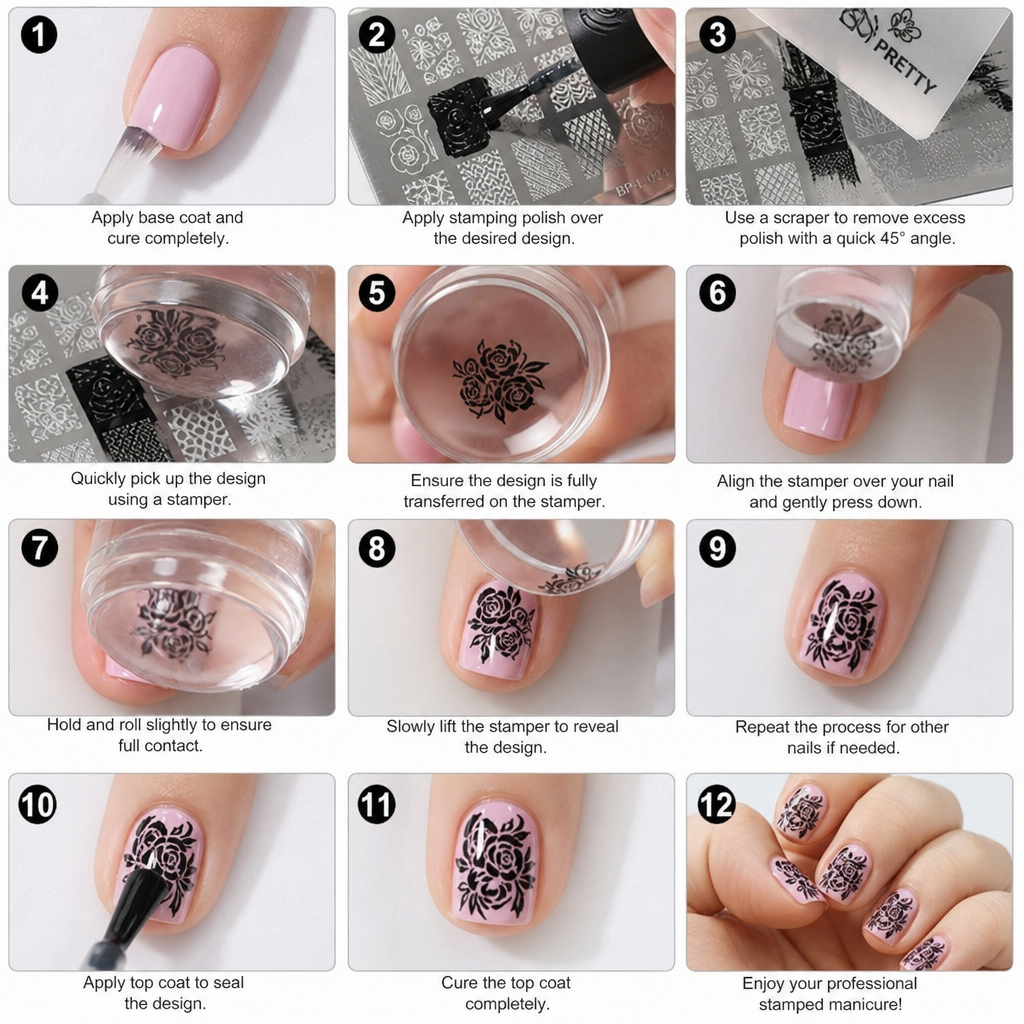
Stamping Your Way to Perfection
Stamping is a technique where you use a silicone pad to pick up polish from an engraved metal plate and transfer it to your nail. If you want intricate lace, mandalas, or typography, investing in professional stamping plates for beginners is a game-changer. Look for plates with deep, crisp etchings, and make sure to use a dedicated stamping polish, which is highly pigmented and thicker than standard polish, ensuring an opaque transfer every time.
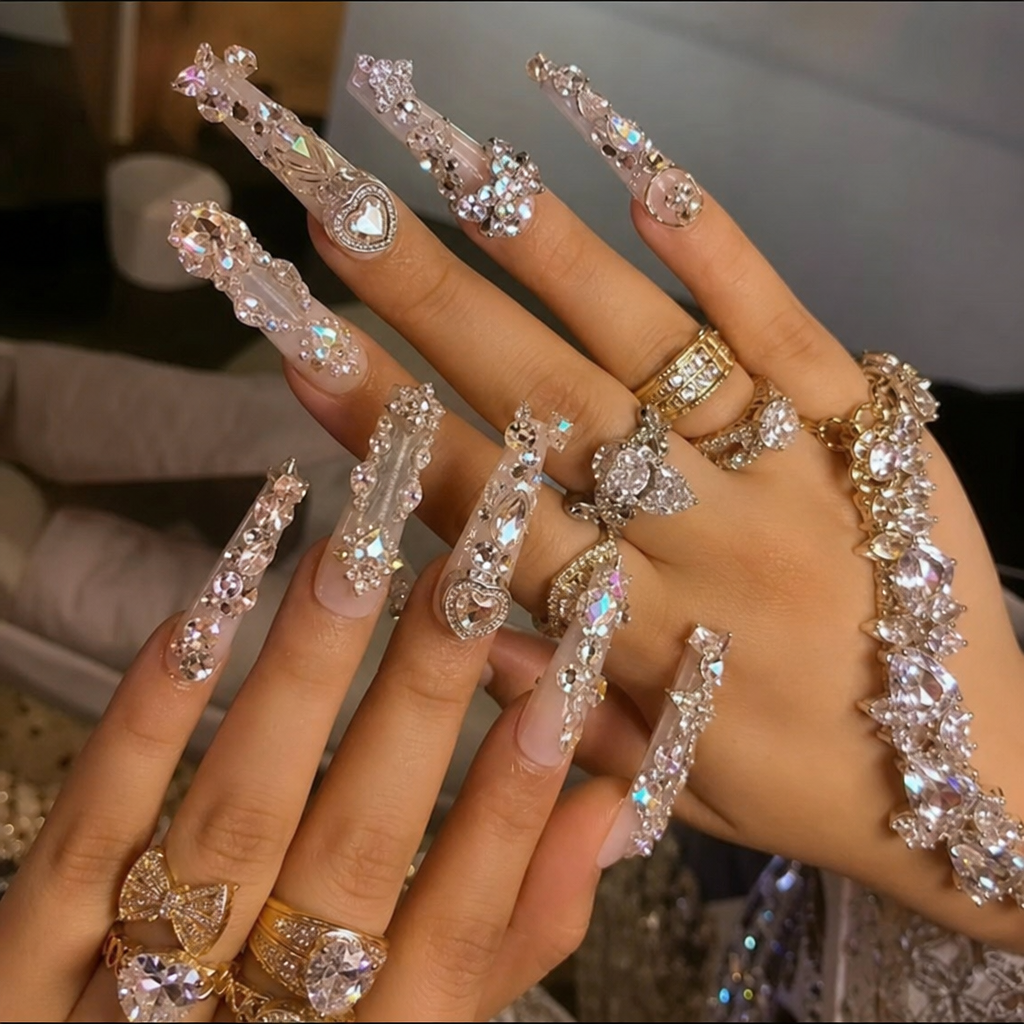
3D Elements: Gems, Jewelry, and Encapsulation
For those who want their manicures to double as jewelry, 3D nail decorations are the ultimate statement. However, working with heavy embellishments requires specific techniques to ensure they are safe, comfortable, and long-lasting.
Keeping Your Charms in Place
A frequent complaint among DIY nail enthusiasts is: why do nail charms keep falling off? The answer almost always comes down to using the wrong adhesive or failing to seal the edges. Standard nail glue dries quickly but becomes brittle and snaps under pressure.
To ensure longevity, you need the best adhesive for heavy nail jewelry. Professional nail technicians typically use a thick builder gel or a specialized rhinestone resin. These formulas are thick enough to fill the gaps between the flat nail and the curved bottom of the charm, acting like a structural cement once cured under a UV/LED lamp.
Additionally, the secret to a snag-free manicure lies in the top coat for rhinestone retention. Never paint your top coat over the top of rhinestones, as this will dull their sparkling facets. Instead, use a fine detail brush to carefully apply top coat around the base of the gems, essentially building a tiny wall that locks them in place.
Safe and Beautiful Accents
As nail art becomes more prominent, so does the awareness of nail health and allergies. If you have sensitive skin, always look for hypoallergenic gems and glitters that do not contain heavy metals or irritants. Furthermore, you can explore non-toxic nail glue alternatives, such as HEMA-free builder gels or plant-based adhesive tabs (for temporary, single-night wear), to protect your nail beds from allergic reactions.
The Art of Encapsulation
If you love 3D elements but hate the feeling of textured nails, encapsulation is the perfect technique. This involves burying decorative elements inside the nail enhancement so the final surface is completely smooth.
Here are the standard steps for encapsulating dried flowers in acrylic:
- Prep and Base: Prepare the natural nail and apply a thin, clear acrylic base layer.
- Placement: While the acrylic is still slightly tacky, use tweezers to gently press your delicate dried flowers onto the nail. Ensure they lay as flat as possible.
- Encapsulation: Pick up a medium-to-large bead of clear acrylic and gently pat and pull it over the flowers, completely encasing them. Build your nail apex as you normally would.
- Refine: Once the acrylic has fully set and hardened, use a file to shape the nail and buff the surface until it is perfectly smooth. The flowers will appear suspended in glass.
- Top Coat: Finish with a high-shine top coat to bring out the vibrant colors of the encapsulated flora.
Essential Nail Tips: Maintenance, Repair, and Removal
Creating beautiful nail styles is only half the battle; maintaining them and removing them safely is just as important.
Quick Fixes for Manicure Mishaps
Even with the best preparation, life happens. If you bump your hand and chip your manicure, you don’t necessarily have to start from scratch. Repairing chipped gel polish art can be done with a little patience:
- Use a fine-grit buffer to gently smooth the hard edges of the chip.
- Clean the area with isopropyl alcohol.
- Apply a tiny dab of base coat to the exposed area and cure.
- Carefully patch the missing color or recreate the missing piece of the design using a fine detail brush. Cure again.
- Apply a layer of top coat over the entire nail to seamlessly blend the patch with the rest of the manicure.
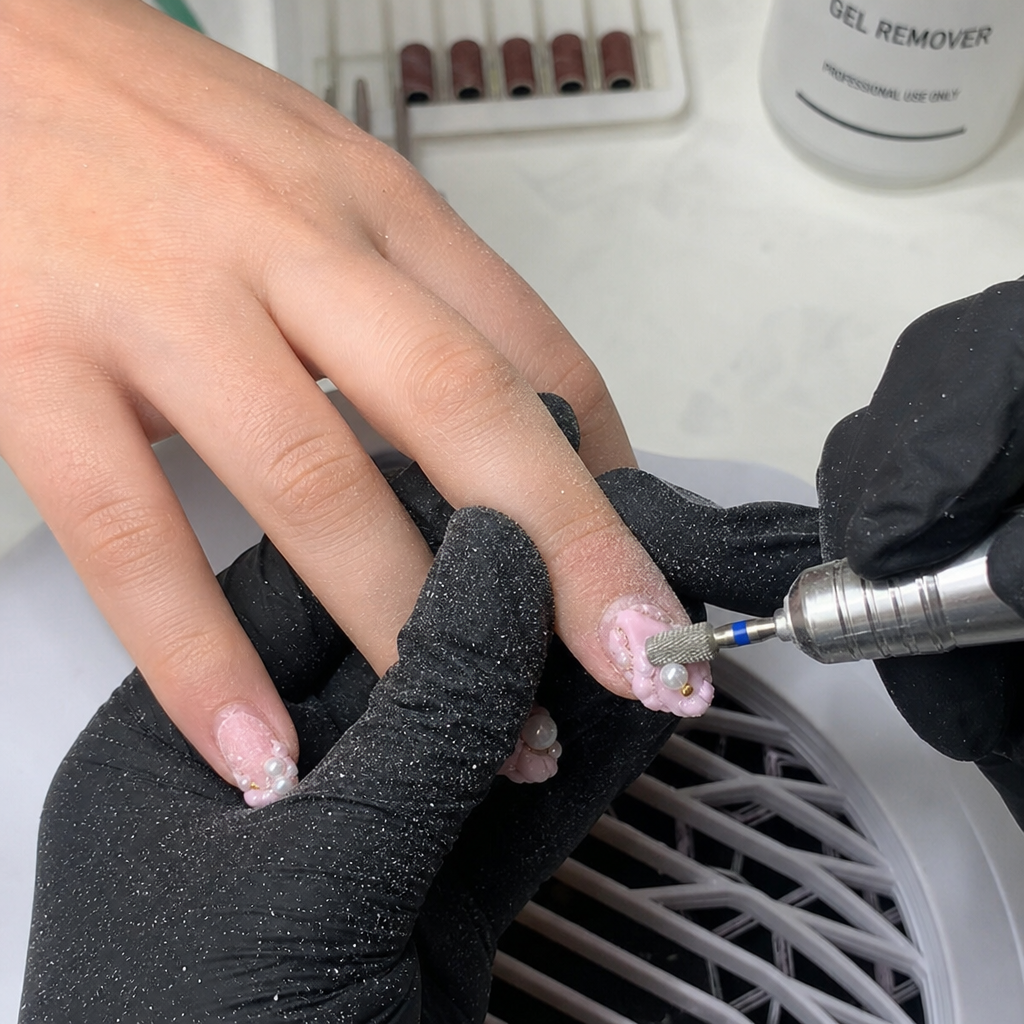
Safe Removal Protocols
The biggest mistake people make with 3D nail decorations is picking or biting them off. This strips layers of your natural nail plate, leading to severe damage and thinning.
When it is time for a new set, removing 3D accents without damage requires the right tools. Use an old pair of cuticle nippers (do not use your good ones, as this will dull them!) to gently pinch the adhesive base of the charm or rhinestone. Do not pull upward. Simply pinching the base will usually crack the resin seal, allowing the gem to pop off safely. Once the bulky jewelry is removed, you can safely file off the top coat and soak the remaining gel or acrylic in pure acetone until it easily crumbles away.
Conclusion
The universe of nail decorations is vast, colorful, and infinitely creative. Whether you are experimenting with minimalist negative space styles for the workweek, mastering holographic chrome powder application for a night out, or embedding delicate flowers into acrylics, there are endless ways to showcase your personality at your fingertips.
Remember, creating stunning nail designs is a journey. Don’t be afraid to experiment with different textures, tools, and color palettes. Equip yourself with the right knowledge, prioritize the health of your natural nails, and most importantly, have fun bringing your unique nail ideas to life!